Board game design is not a straight path; it's a loop you'll repeat many times.
The Iterative Loop (The Real Board Game Design Process)
People often imagine design as a clean sequence:
Idea → Prototype → Test → Done.
In reality, it looks more like this:
Idea → Prototype → Test → Feedback → Conclusions → Fixes → Prototype → Test → …
until the game becomes something worth sharing.
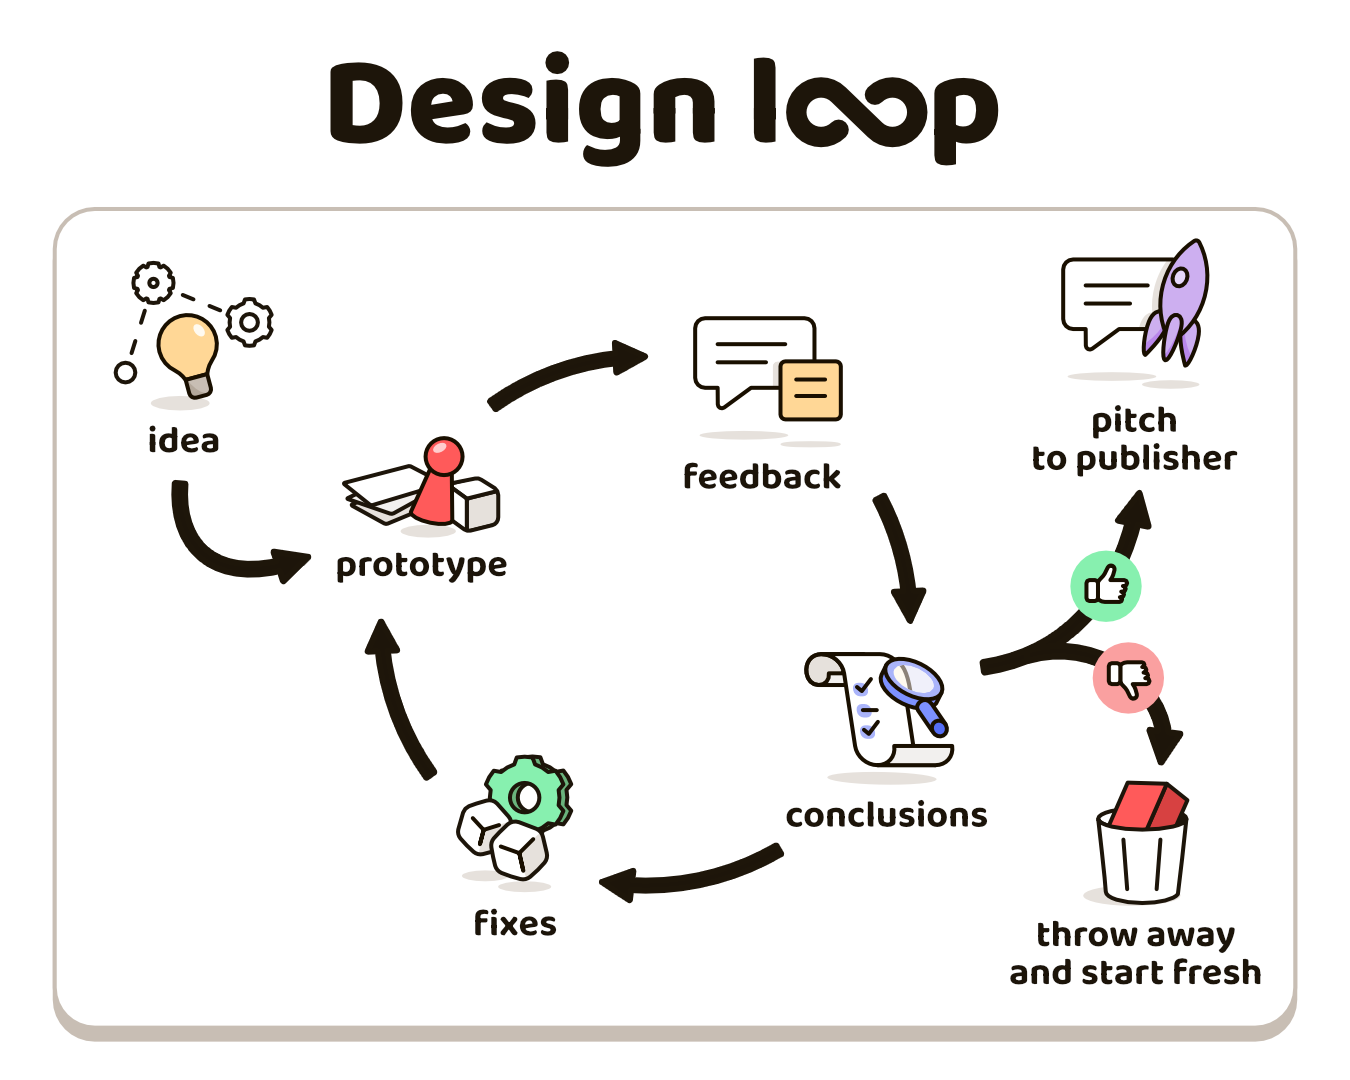
To make this clearer, we’ll describe the stages like a sequence, but remember: you’ll cycle through them many times.
1) The Spark: Idea
"I'll start prototyping when everything is solved"
That moment never comes. Your idea needs friction with reality to grow.
2) The Prototype: Making It Physical
A prototype isn’t a product. It’s a tool. Its purpose is to show you what you don't know. The best prototypes are:
- lightweight
- disposable
- clean enough to read
- fast enough to remake
3) The Test: Playing Your Own Idea
This is where design moves from theory into practice.
Your first test should be you, alone, playing multiple hands.
Not to win, but to see what happens.
You’re not simulating genius strategy. You’re exploring:
- Do the mechanics do anything at all?
- Is there even a game here?
- Are players making decisions, or just performing steps?
- Where is the fun hiding?
Later, you’ll test with other people, but early testing with yourself lets you discover issues faster and avoid wasting others’ time before the idea even works.
The first test is not about results. It’s about information. You’ll quickly discover something important:
Everything you didn't think about becomes visible immediately.
And that’s good news.
4) Feedback: Listening to the Game
After testing, give yourself time, even ten minutes, to reflect.
Ask:
- What felt fun?
- What felt empty?
- Which mechanic gave a hint of promise?
- Where did the game break?
If you test with others:
- listen more than you talk
- ask why they felt something
- don’t defend your ideas. Understand feedback
Remember: your perspective is not the players’ perspective. Both are valid, but players experience the game you made, not the one you imagined.
5) Conclusions: Deciding What Matters
After feedback, you choose a direction.
Usually, there are three paths:
A) Fix and Iterate
B) Start Fresh
Nothing worked, and that’s okay. You learned something, and that knowledge transfers to the next project.
Throwing a design away is not failure. It's progress.
C) Share & Pitch
Why the Loop Matters More Than the Idea
- how players think
- where fun lives and dies
- what your game is really about
- which mechanic creates decisions
- where rules can be simplified
- what to delete (the hardest skill)
- how to simplify
Where Beginners Usually Struggle
Why Iteration Builds Confidence
The loop is not just about improving games. It’s about improving you.
Every cycle:
- you understand player psychology better
- you get faster at spotting flaws
- you become braver about cutting features
- you reduce overthinking
- you gain intuition
Over time, you stop guessing and start predicting how a change will behave. That’s design maturity. And it’s earned the same way everywhere:
by putting prototypes on the table.
Want the Full Beginner Course?
We’ve launched a complete Beginner Game Design Course covering:
- how to start your prototype
- how to test effectively
- how to gather useful feedback
- how to write rules
- how to make iteration decisions
- how to know what to fix
If you want to start designing confidently, with a repeatable system, you can check our beginner course Board Game Design Fundamentals: A Step-By-Step Guide
Want to explore something next? Let us know by email or on our social channels.
We’re into learning, and your feedback guides our next steps at TableHop.